Canvas Stretcher Frame
Miguel,
For the past several years I have been designing a painting table to allow for 20 people to pour at once, each with a larger field of responsibility. Having a mobile painting table would allow me to travel to public art opportunities and residencies. When it comes time to apply, I will have to account for the shipping of this painting table. Looking towards this future, I envisioned how the table could break down into its smallest components, fitting into two, 4 foot road cases. I made this 3d animation of how it would unpack, with examples of different types of connections.
continued…
This animation, as well as the image above, showing the component parts of the stretcher frame, are the beginnings of how it could be done. My goal is to make some version of this stretcher frame that would enable me to accomplish two events this summer. Producing these events, and showing the video footage from them, will enable me to succeed at other grants in the coming years.
My hope is that whatever version of this stretcher frame we could make by this summer, would be able to be cut into smaller pieces and connectors could be added when money allowed.
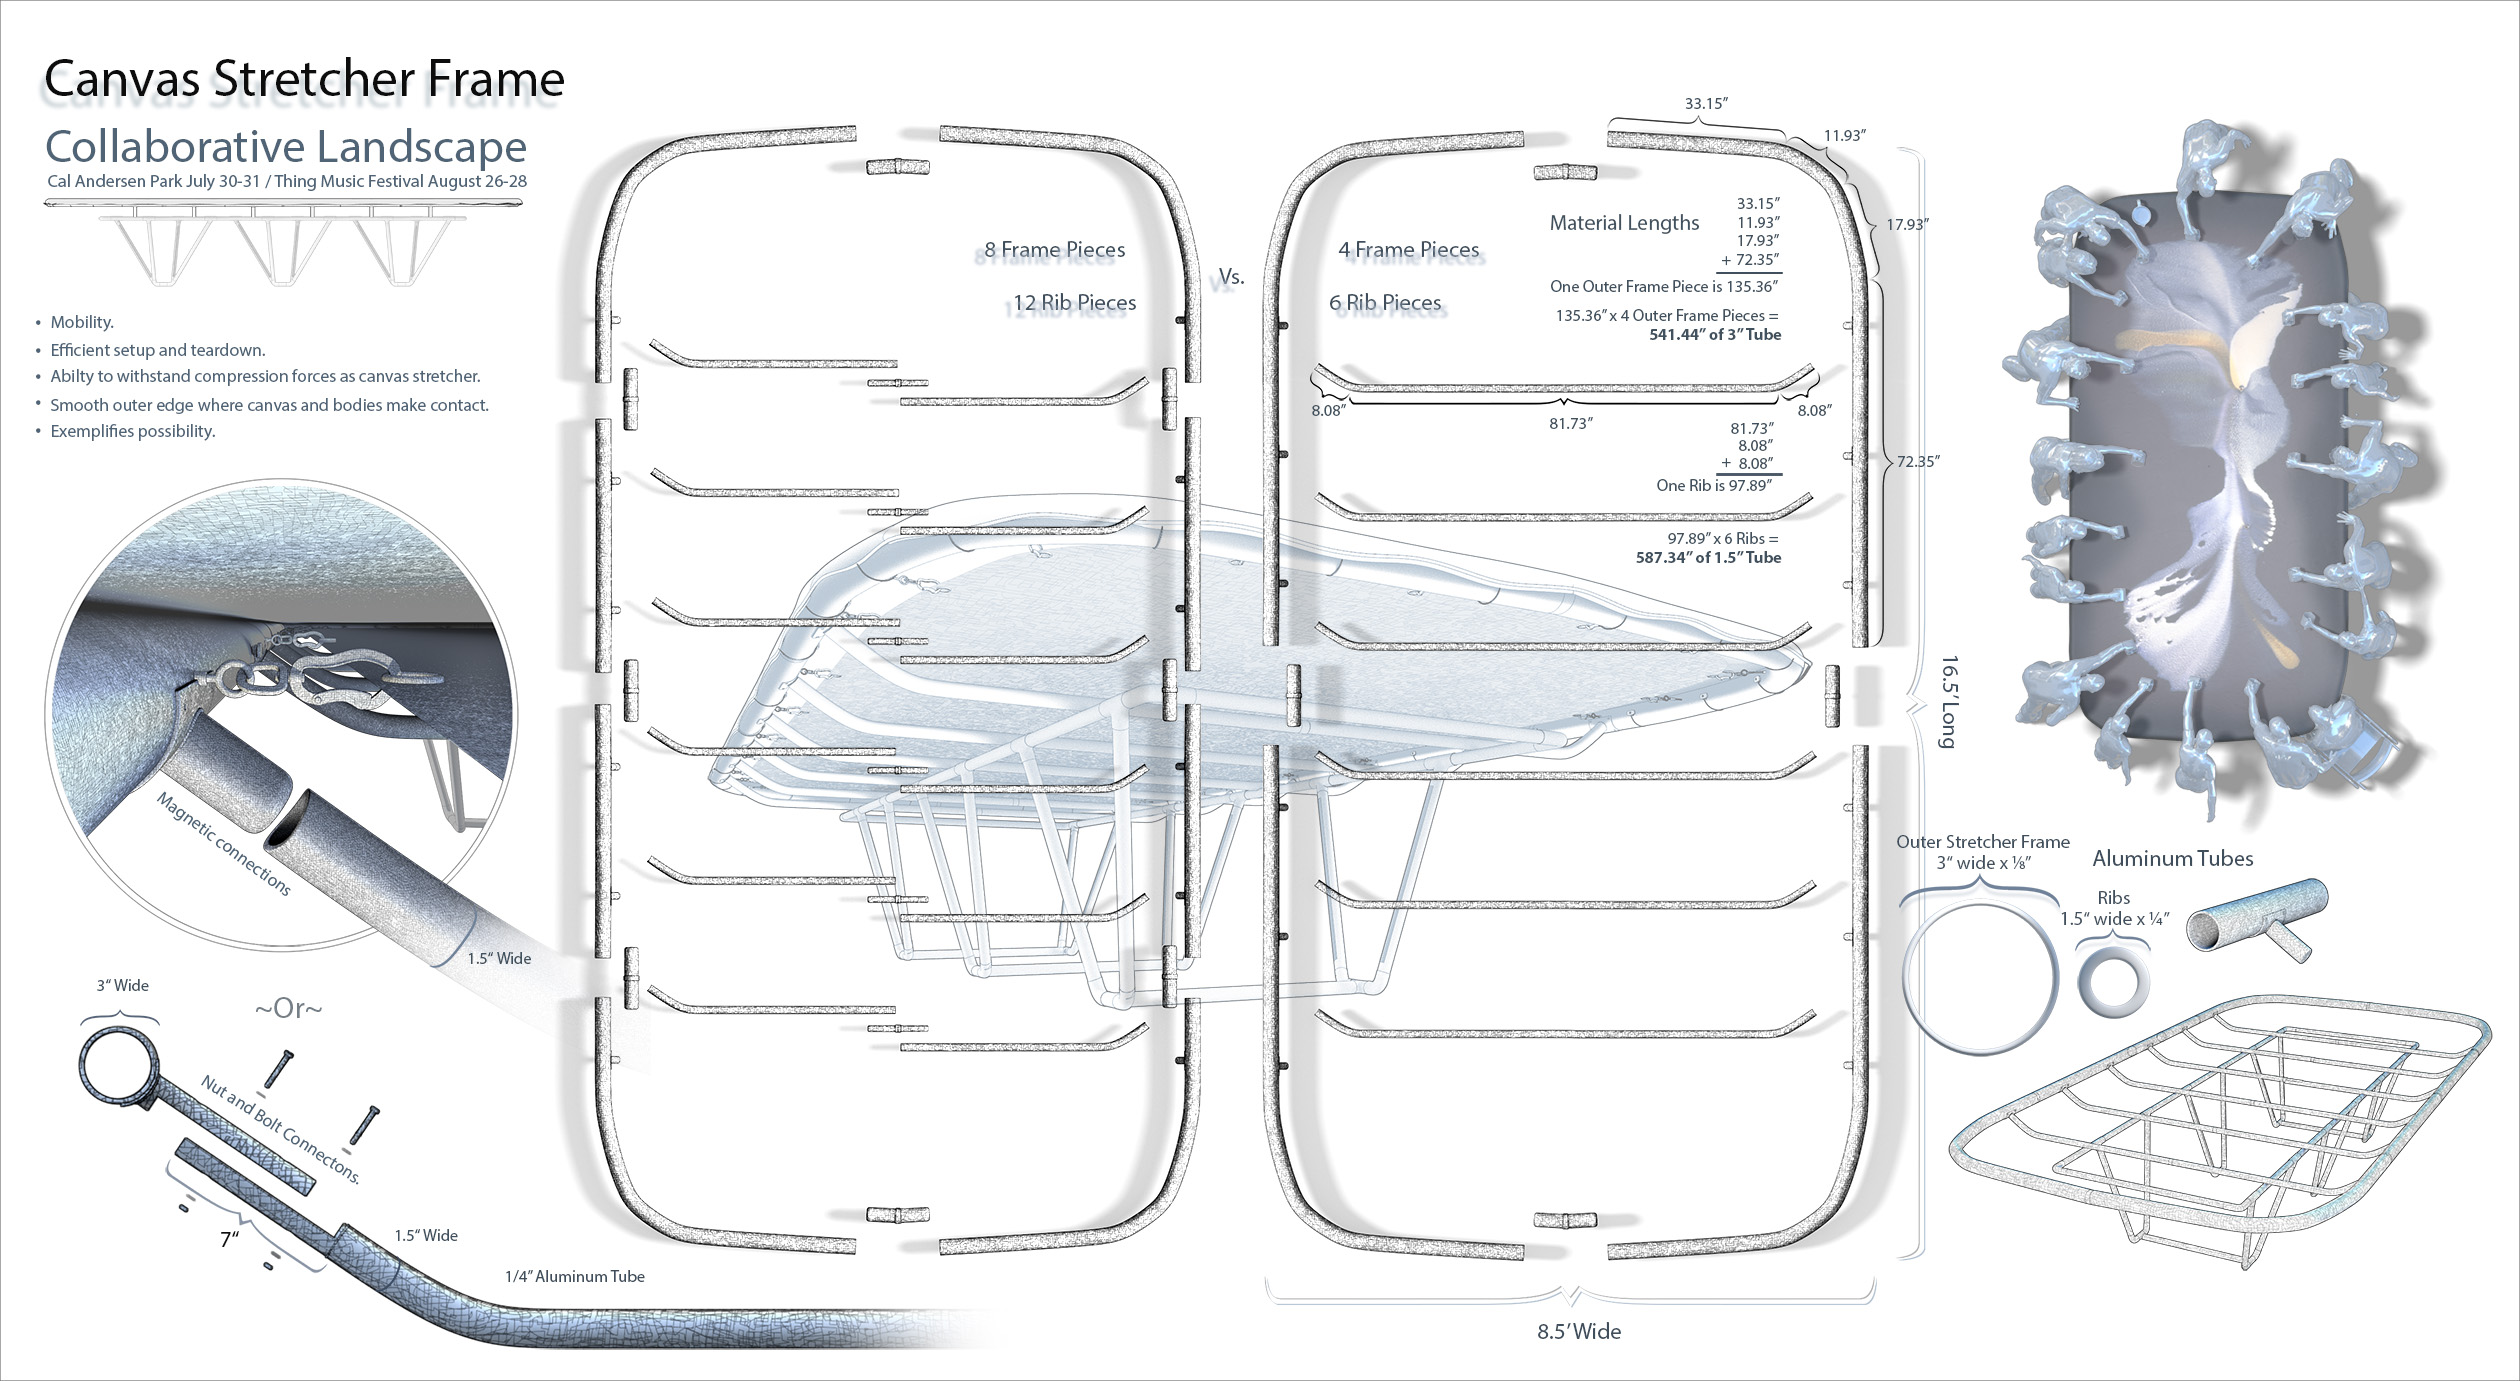
I have a Dodge Ram van and can pull a trailer. While it would be helpful to be able to take the outer frame apart into four pieces, with six ribs, I am also open to the idea of making a solid, continuous, welded frame, which could be hauled on a trailer. I am imagine the most expensive part of this project will be the time it takes to fabricate each joint. Also, the type of joints will affect the cost. Because I will be asking for help at each location to set up and breakdown the table, I have started with designs that focus on ease of assembly. I heard about magnetic connectors that a company named Rock Lititz uses in stage production and thought those types of connections would be ideal, as opposed to using bolts to hold pieces together. I have a friend who is reaching out to this company to see if they might be willing to collaborate using their connectors. I have also designed alternative nut and bolt connections. My hope was to give you a good visual idea of the work involved so you could make a judgement on weather or not you would like to work on the project. If I were fortunate enough to work with you, I would like to incorporate your design changes as well.
The table has to perform a few main functions. It should be able to withstand the compression forces of stretching a canvas around it, also with a layer of pre-constraint underneath. You might already be familiar with this pre-constraint material as a more rigid synthetic canvas used to make awnings on store fronts and to cover loads in the trucking industry. Breezy Canvas, who is helping me make the large canvases, introduced me to the material when we were discussing ways to take the vibration out of a large canvas surface. When collaborating in these large groups, I often focus a camera with a macro lens on the surface to show the celestial and geological effects of the paint flows. These images are put on a screen or sometimes projected on a wall for everyone to see their impacts. As you can imagine, the hardest part about getting this footage, is stabilizing the image. By stretching a layer of pre-constraint under the canvas, and then rolling out a layer of carpet padding or closed cell foam, the canvas vibration could be substantially dampened.
This canvas does not have to be extremely tight. It will benefit from some slope towards the middle, to allow the paint and water to drain into a hole at its lowest point towards the center. It will be important though, for the frame to withstand some tension. It seems like aluminum tube would be the best material for its lightness and stability.
For the outer rim of the stretcher frame, I thought 3 inch aluminum tube with a wall thickness of 1/8 inch is a good place to start in a design. This circumference would also allow the canvas to be stretched around its outside edge.This design has six ribs to withstand the compression of the canvas materials pulling inwards. The first image of the design on the layout above, shows the 8 foot ribs separated into two 4 foot pieces for ease of transport. The second version of the design on the layout shows each 8 foot rib as one continuous piece that could be bolted to the outer frame at each end. Not pictured, could be the same outer frame but with only three ribs, each of which could be welded to the outer frame. I imagine this would be the most economical structure to make for this summer and I am shooting for something between this solid version and one that could be taken apart into 8 foot pieces. As far as strength, these 8 foot ribs would also be secured to table legs underneath, reducing flex along their 8 foot spans.
While the table legs are pictured in my design, my goal is to not fabricate them right now. Instead, I would build them out of wood for this summer‘s events. I am assuming they would be too expensive to make out of aluminum at this point. My priority is to accomplish the stretcher frame show what is possible.
I am extremely grateful for your time and I know that looking at and calculating these things takes effort.
Thank you Miguel,
Jesse
If you need to share how this process works, here is a video of paintings I have been making with the eight foot table frame, and the public paint pours we have accomplished with it.